[ad_1]
When you add the first domain to your hosting account, cPanel & WHM configures everything it needs to serve a website, including the document root, a directory to store the site’s files. The default file location for the root domain is public_html in your /home directory, but you can change the document root if you want to keep the files somewhere else.
Why Change the Root Domain’s Document Root?
The most common reason to move the document root is to give the site its own directory under public_html.
A cPanel hosting account always has a root domain, also known as a primary domain, but you can also host Addon domains or subdomains with the same account. Each has a directory under public_html, mixed in with the primary domain’s files. This doesn’t affect the webserver, but it can become somewhat disorganized if you have lots of domains.
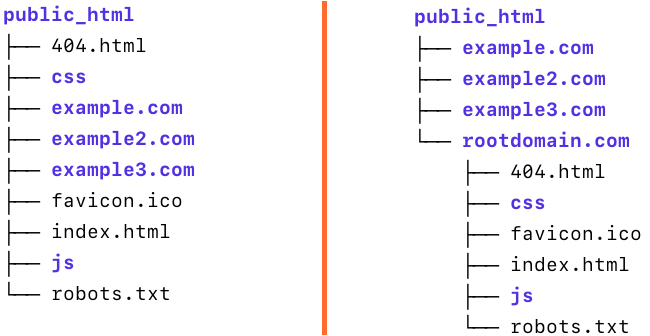
Changing the document root lets you move the primary domain’s files to a directory inside public_html. Here’s what public_html might look like before and after changing the domain’s directory.

We’re going to show you how to move your site from public_html to a subdirectory, but you can use a similar process to move it anywhere in your user’s home directory.
How to Change the Root Domain’s Directory
There are a few prerequisites you’ll need before we can begin:
- SSH access to the hosting server. SSH is a command-line tool on your PC or Mac. It is used to log in to the server and access its command line. An SSH client is installed by default on Mac® and Linux® computers, and you can use it in the Terminal.app program on macOS® or your preferred terminal app on Linux. On Microsoft Windows, you may need to install an application such as PuTTY.
- The ability to log in as the root user. The root user can access and modify any file on the server, including the system configuration files we’ll be editing in this tutorial. On shared hosting systems, you may not be able to log in as root. In that case, you will need to contact your hosting provider to make the changes.
- A text editor. You can use any command-line text editor. Vim and nano are popular options. We have used nano in our examples because it is easier to use than vi or vim for less experienced system administrators. You can install nano with the command “yum install nano” on CentOS servers.
Your hosting provider may not support SSH access or allow you to make changes to system files. In that case, you will need to contact their support staff to change the root domain’s directory, although it may not be possible on some hosting accounts.
Log in with SSH as root, and then run the following command, replacing username with your cPanel account username and example.com with your primary domain.
nano /var/cpanel/userdata/username/example.comThis opens the nano text editor with the configuration file for your domain. Find the line that says:
documentroot: /home/username/public_html
Edit it to read something like:
documentroot: /home/username/example.com
As before, username is your username and example.com should be replaced with your domain name (although you can call the subdirectory anything you want, provided you are consistent).
Next, find the line that looks like this:
path: /home/username/public_html/cgi-bin
Edit the line to change public_html to your domain, like so:
path: /home/username/example.com/cgi-binSave the file by pressing Control-x, then Y, and then enter. Next, delete the domain’s cache file.
rm -vf /var/cpanel/userdata/username/example.com.cacheIf your domain has an SSL certificate, we need to tell the system where to find it. Open the configuration file with
nano /var/cpanel/userdata/username/example.com_SSL
The edits we need to make are the same as in the previous file. Find this line:
documentroot: /home/username/public_html
Change public_html to your domain name or the name you chose for the new directory. Save the file, and, as before, we should delete the cache.
rm -vf /var/cpanel/userdata/username/example.com_SSL.cache
We need to run a couple of scripts to create new caches and rewrite Apache’s configuration files with the new location.
/scripts/updateuserdatacache
/scripts/rebuildhttpdconf
Finally, restart Apache so that the configuration changes take effect.
service httpd restart
You can now move the site’s files to their new location.
Redirect Requests to the New Document Root
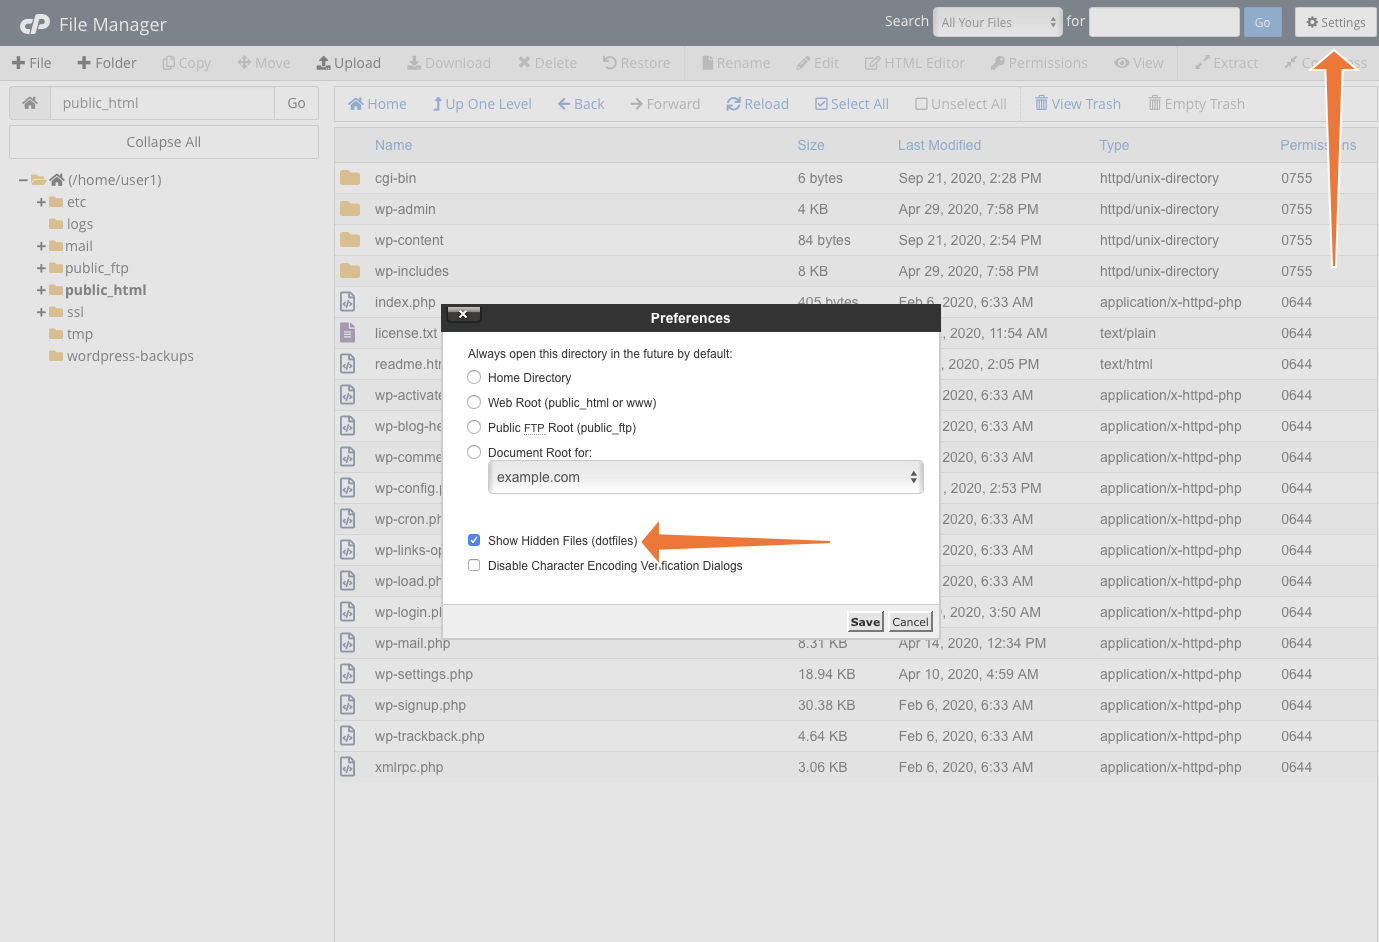
The final step is to add instructions to Apache’s .htaccess configuration file to redirect requests to the new location. You will find the .htaccess file in the domain’s document root, but you may need to create it if it doesn’t already exist. You can edit it on the command line or in cPanel’s File Manager. If you use File Manager, be sure to turn on Show Hidden Files in File Manager’s settings. Because .htaccess is a dotfile—it begins with a dot—it’s hidden by default.

The following directives from WordPress®’s documentation will work for WordPress and many other sites:
<IfModule mod_rewrite.c>
RewriteEngine on
RewriteCond %{HTTP_HOST} ^(www.)?example.com$
RewriteCond %{REQUEST_URI} !^/my_subdir/
RewriteCond %{REQUEST_FILENAME} !-f
RewriteCond %{REQUEST_FILENAME} !-d
RewriteRule ^(.*)$ /my_subdir/$1
RewriteCond %{HTTP_HOST} ^(www.)?example.com$
RewriteRule ^(/)?$ my_subdir/index.php [L]
</IfModule>
Be sure to replace example.com with your domain and my_subdir with your site’s new location.
Other CMS’s may have additional requirements, so we recommend that you check your content management system’s documentation before making these changes:
As always, if you have any feedback or comments, please let us know. We are here to help in the best ways we can. You’ll find us on Discord, the cPanel forums, and Reddit.
[ad_2]
Source link


